Complete Guide
Peptide Administration Guide
Everything you need to know about safe, effective peptide use — from supplies and reconstitution to injection technique and storage.
What You'll Need
Bacteriostatic Water (BAC Water)
Sterile water with benzyl alcohol preservative. Essential for reconstitution. Look for USP-grade from medical suppliers.
Insulin Syringes
29-31 gauge, 0.5mL or 1mL capacity. Smaller gauge = less pain. 1mL syringes offer better accuracy for doses.
Alcohol Swabs
70% isopropyl alcohol swabs for cleaning vial tops and injection sites. Purchase sterile, individually wrapped.
Peptide Vials
Pharmaceutical-grade glass vials. Ensure they arrive intact and sealed. Check for clarity and integrity.
Sharps Container
Proper medical sharps disposal container. Do not reuse old containers. Essential for safe needle disposal.
Clean Workspace
Clean, flat surface. Alcohol-wipe the area before reconstitution. Keep away from dust, pets, and contamination.
Video: Setting Up Your Peptide Workspace
Reconstitution
Reconstitution is the process of mixing lyophilized (freeze-dried) peptide powder with bacteriostatic water to create an injectable solution. This is essential for accurate dosing and safe administration.
Step-by-Step Instructions
Clean the rubber stopper on the peptide vial with an alcohol swab. Let it air dry.
Draw the appropriate amount of BAC water into your syringe (e.g., 2mL).
Insert the needle through the rubber stopper and inject the BAC water slowly into the vial.
Gently swirl the vial to mix. Never shake — this can denature the peptide.
If foamy, let the vial sit undisturbed for 5-10 minutes to allow bubbles to subside.
Once mixed, refrigerate immediately at 36-46°F.
Reconstitution Calculator
Punch in your COA numbers — get exact units to draw, concentration, volume per dose, and doses per vial. Single peptide and blend modes.
Video: How to Reconstitute Peptides
A step-by-step guide to properly reconstituting lyophilized peptide vials with bacteriostatic water.
Injection Technique
Subcutaneous (SubQ) injection is the most common route for peptide administration, while shallow intramuscular (IM) injection is preferred for certain peptides like BPC-157 for localized effects. Proper technique minimizes pain, bruising, and infection risk.
Injection Steps
Wash your hands thoroughly with soap and water.
Select an injection site and clean with an alcohol swab. Let air dry.
Gently pinch the skin to create a fold (about 1-2 inches of lifted skin).
Insert the needle at a 45° angle, approximately 1/4 inch into the fat layer.
Inject slowly and steadily. Rushing increases discomfort.
Remove the needle and apply light pressure with an alcohol swab for 5-10 seconds.
Dispose of the syringe immediately in your sharps container.
Injection Site Rotation
Rotating injection sites prevents lipohypertrophy (localized fat thickening) and ensures consistent absorption. Space injections at least 1 inch apart. Recommended sites include the deltoid, abdomen, outer quad, lat, and gluteus medius.
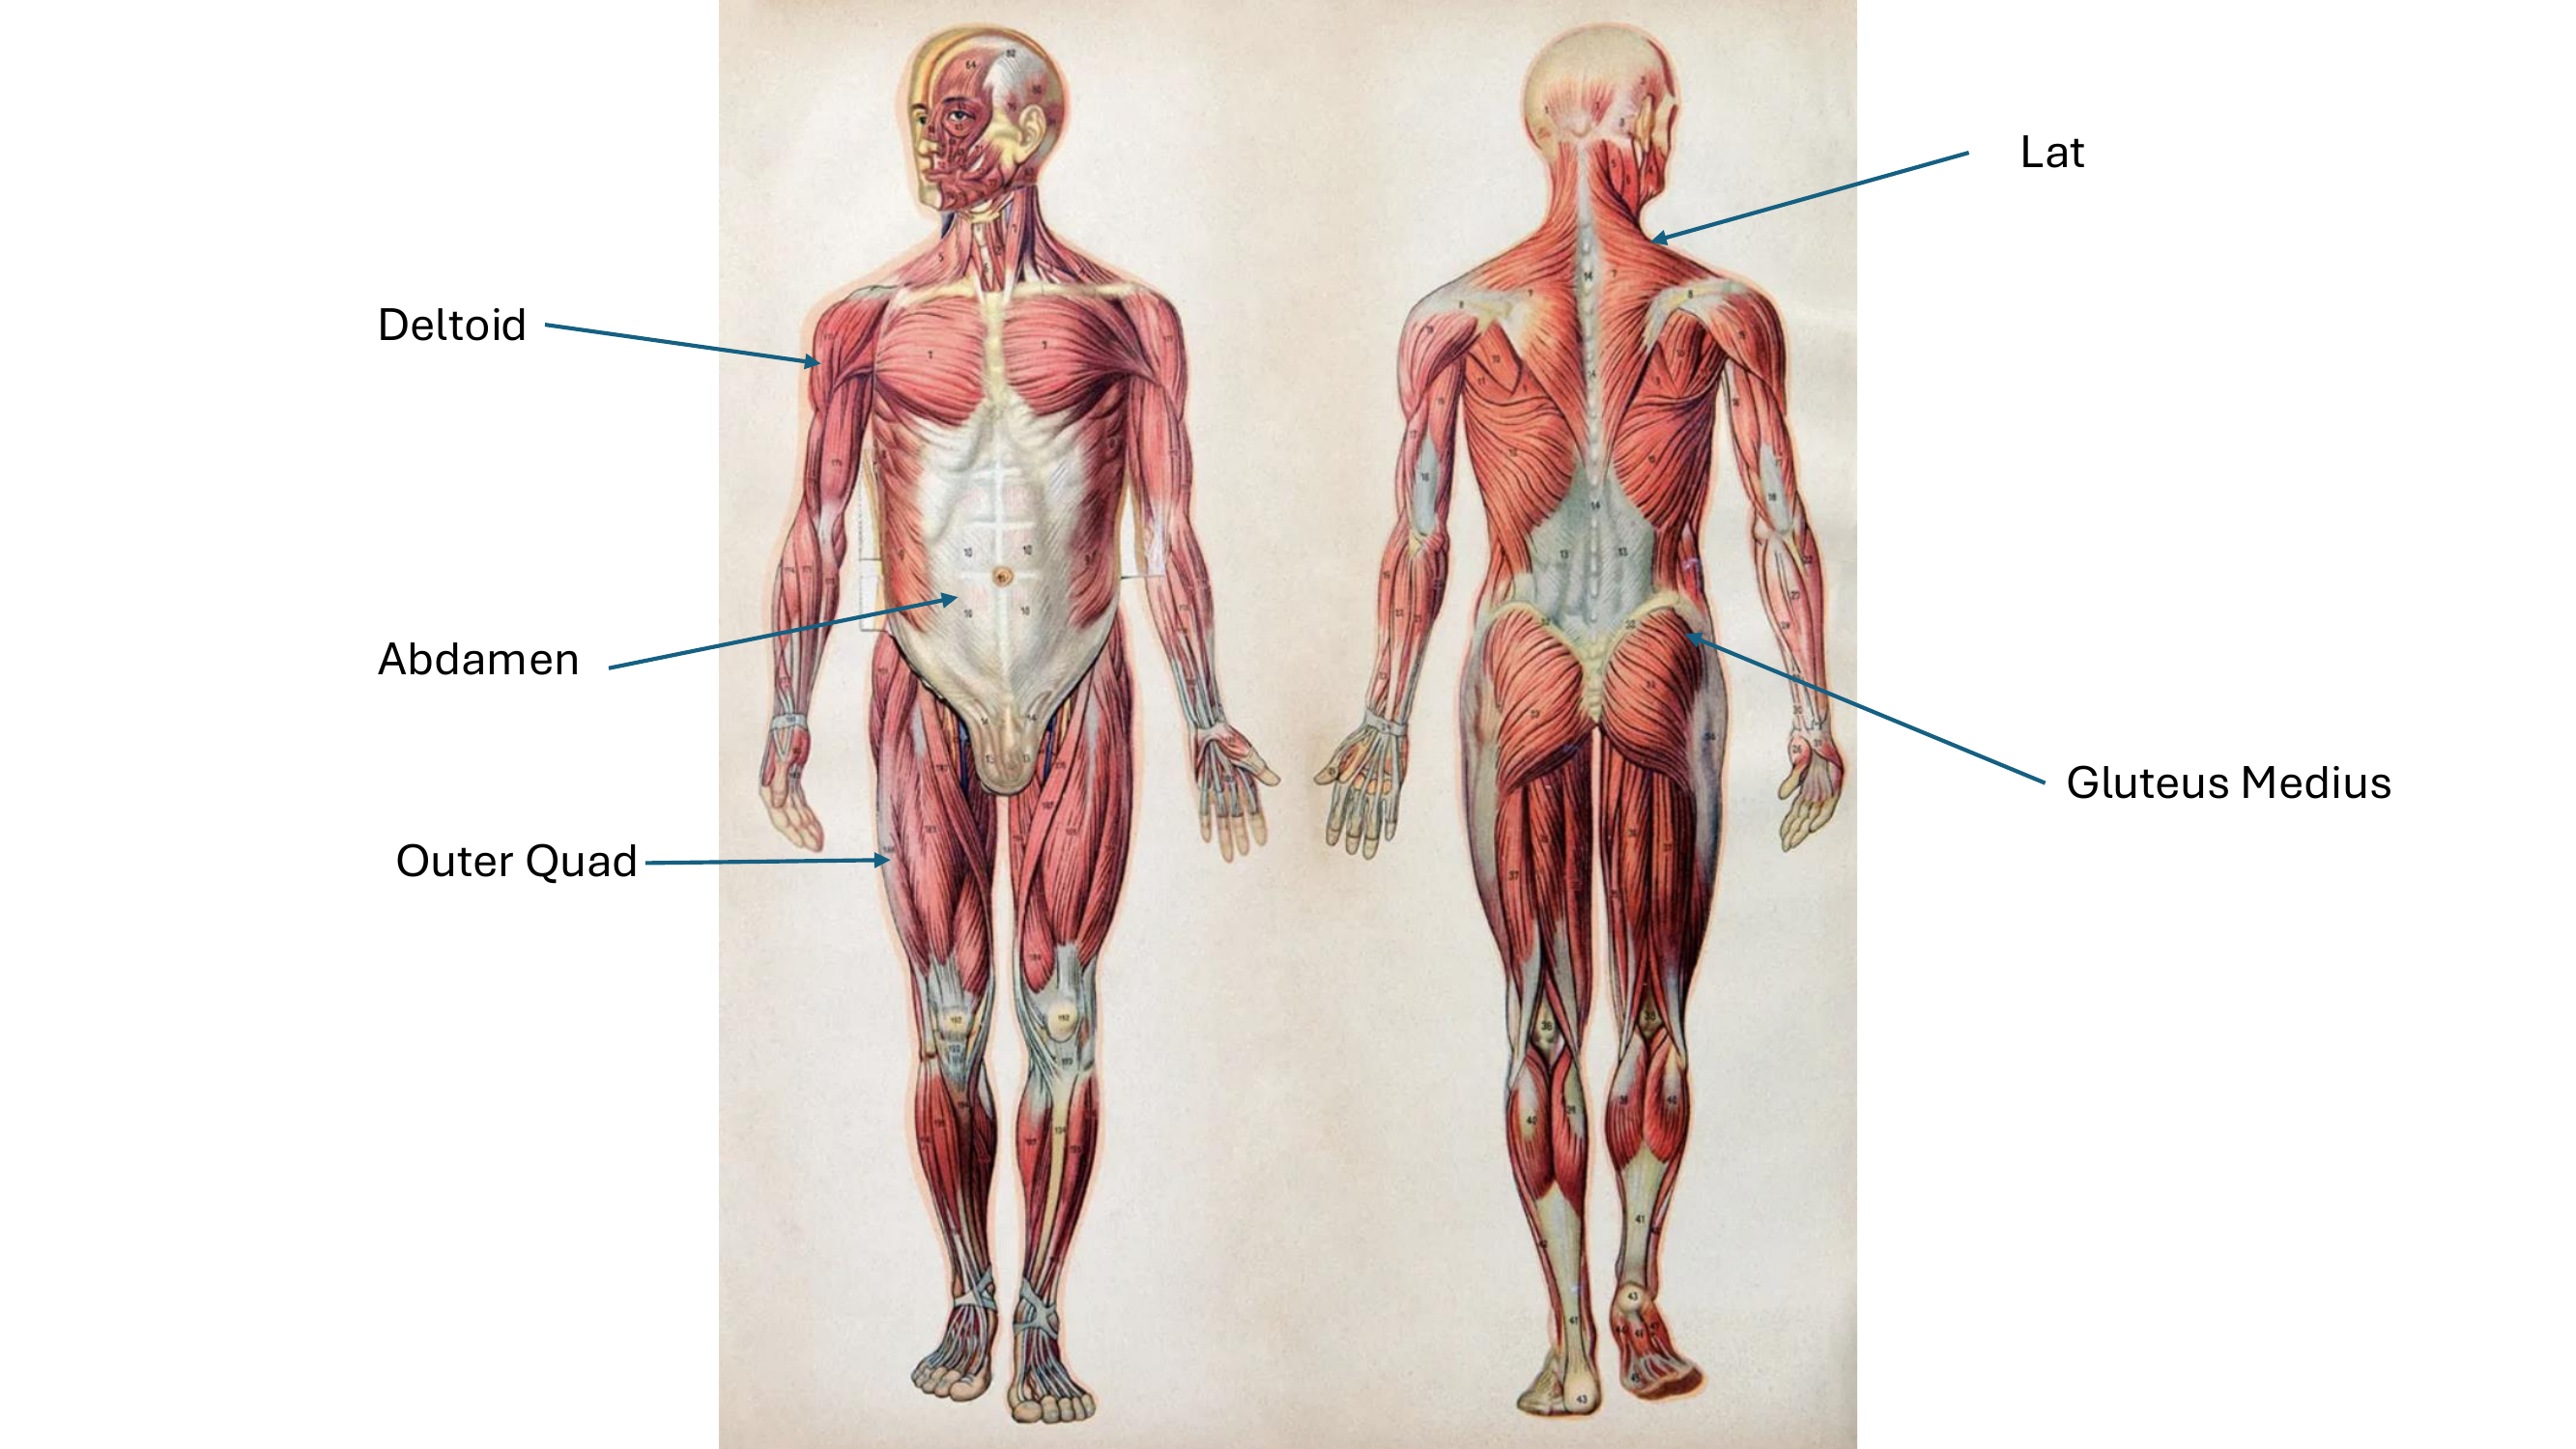
Rotate between all injection sites to prevent tissue buildup
Injection Tips
- Use a fresh needle every time — reusing dulls the needle and increases pain.
- Smaller gauge (higher number) = thinner needle = less pain. 31G is ideal.
- Room temperature peptide solutions inject more comfortably than cold ones.
- Minor bruising is normal. Ice packs after injection can minimize it.
- Inject at the same time each day for consistency.
- If you experience pain during injection, you may have hit a nerve — stop and try a different site.
Shallow Intramuscular (IM) Injection
Some peptides — particularly BPC-157 for injury repair — benefit from shallow IM injection, which delivers the compound directly into muscle tissue near the target area. This is different from deep IM injections used for vaccines and is sometimes called “intra-lesional” when injecting near an injury site.
When to Use Shallow IM vs. SubQ
Shallow IM Steps
Wash your hands and clean the injection site with an alcohol swab.
Use an insulin syringe (29-31G, ½ inch needle). The short needle naturally limits depth.
Identify the muscle closest to the injury or target area.
Insert the needle at a 90° angle (straight in) to the full depth of the ½ inch needle.
Aspirate briefly (pull back the plunger slightly) — if blood appears, withdraw and try a nearby spot.
Inject slowly over 5-10 seconds.
Withdraw the needle and apply light pressure with a clean swab.
Common Shallow IM Sites
Deltoid (shoulder)
Shoulder injuries, general upper body
Vastus lateralis (outer thigh)
Knee injuries, quad/hamstring repair
Near injury site
Within 1-2 inches of the affected tendon, ligament, or muscle
Glute (upper outer)
Hip injuries, lower back issues
Important Note on IM Injections
Shallow IM with an insulin syringe is very different from deep IM injections (like those used for testosterone or vaccines, which use longer 1-1.5” needles). Never attempt deep IM injection without proper guidance. If you're unsure about technique, consult a healthcare provider for your first injection.
Video: Injection Tutorials
Storage & Handling
Before Reconstitution
- •Temperature: Room temperature or refrigerated (2-8°C)
- •Storage: Away from direct sunlight, heat, and moisture
- •Shelf life: Typically 2-3 years when stored properly
- •Container: Keep in original vial until ready to use
After Reconstitution
- •Temperature: MUST be refrigerated at 36-46°F (2-8°C)
- •Duration: Use within 4-6 weeks of reconstitution
- •NEVER freeze: Freezing denatures the peptide
- •Label immediately: Write date mixed and expiration date
Bacteriostatic Water
- •Temperature: Room temperature, away from light
- •Expiration: Check expiration date before using
- •Container: Keep in original sealed bottle until use
Travel Tips
- •Use an insulated cooler bag with ice packs to maintain temperature
- •Keep peptides away from extreme heat or freezing temperatures
- •TSA allows medications (peptides) in carry-on luggage. Keep vials in original labeling.
- •International travel: verify local regulations before packing peptides
Signs of Degradation
Do not use if you observe:
- •Discoloration (should be clear)
- •Particles or cloudiness
- •Unusual smell or odor
- •Vial or seal integrity compromised
- •Past expiration date
Reading Your Peptides
Understanding vial labels and documentation ensures you know exactly what you're using and its quality.
What's on the Label
Peptide Name
The official name of the peptide (e.g., BPC-157, TB-500)
Amount (mg)
Total milligrams of peptide in the vial. Example: 10mg
Batch/Lot Number
Identifies the specific production batch for traceability
Expiration Date
Date after which the peptide should not be used
Storage Instructions
Recommended storage temperature and conditions (usually 2-8°C)
Supplier/Manufacturer
Company that produced or distributed the peptide
Certificate of Analysis (CoA)
A CoA is a document from the manufacturer confirming the quality and purity of the peptide. Always request this from your supplier.
Purity
Should be >98%. This percentage indicates how pure the peptide is.
HPLC Testing
High-Performance Liquid Chromatography. Confirms identity and purity.
Mass Spectrometry
Confirms the exact molecular weight of the peptide.
Testing Date
When the batch was tested. More recent is better.
Unit Conversions
1 mg = 1,000 mcg (micrograms)
Understanding these units is critical for accurate dosing:
- mgMilligram — larger unit, used to describe vial contents
- mcgMicrogram — smaller unit, used for individual doses
Safety & Troubleshooting
When NOT to Inject
Do NOT inject if any of the following apply:
- ✕Vial appears cloudy or discolored after reconstitution
- ✕You see visible particles in the solution
- ✕The vial has an unusual smell or odor
- ✕Injection site is irritated, infected, or showing signs of rash
- ✕You have a fever or acute illness
- ✕The peptide has passed its expiration date
- ✕The vial seal or integrity is compromised
Common Side Effects
Minor bruising
✓ NORMAL: Normal. Use ice packs post-injection to minimize.
Slight redness at injection site
✓ NORMAL: Usually resolves within a few hours. Keep area clean.
Mild discomfort during injection
✓ NORMAL: Use a fresh, sharp needle. Warmer solution helps.
Swelling or significant redness
⚠ CONCERNING: May indicate infection or allergic reaction. Seek care.
Severe pain or numbness
⚠ CONCERNING: You may have hit a nerve. Do not inject in that area again.
Signs of infection (pus, warmth, red streaks)
⚠ CONCERNING: Seek immediate medical attention.
When to Seek Medical Attention
Stop using the peptide and contact a healthcare provider if you experience:
- Signs of infection (increased redness, warmth, pus, streaking)
- Severe allergic reaction (difficulty breathing, swelling of face/throat)
- Severe pain, numbness, or tingling
- Unexplained fever or illness
- Chest pain or shortness of breath
- Any symptom that concerns you
Sharps Disposal
Proper needle and syringe disposal is critical for safety:
Important Disclaimer
This guide is for educational purposes only and does not constitute medical advice. Peptides may carry risks, and individual responses vary. Always consult with a qualified healthcare provider before starting any new protocol. You are responsible for following all applicable laws and regulations in your jurisdiction. Neither the author nor the site assumes liability for misuse or adverse outcomes.
Disclaimer: The content on this site is for educational and informational purposes only. It is not intended as medical advice and should not be used as a substitute for professional medical guidance, diagnosis, or treatment. Always consult with a qualified healthcare provider before beginning any new protocol.